Thursday, April 30, 2009

Curried Egg Salad

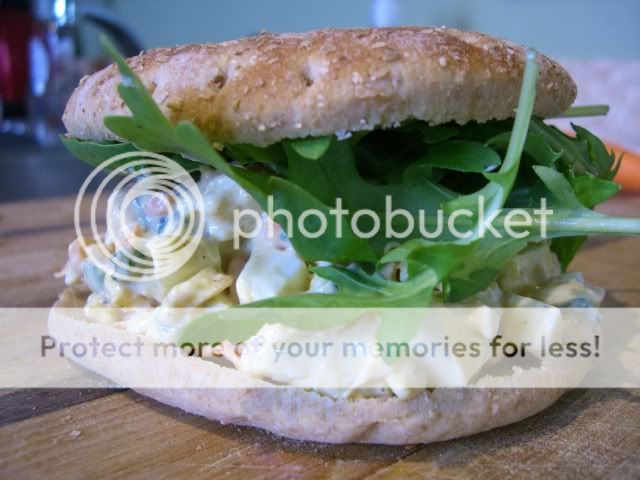
When I was in elementary school, there was this one boy who we all ruthlessly made fun of because he brought egg salad sandwiches for lunch, and egg salad was WEIRD to the rest of us with our Lunchables and PB&J sandwiches. So, imagine my shock when a few years later I discovered that I really liked egg salad. I still feel guilty for making fun of that kid all the time.

I woke up Wednesday morning and realized I had nothing to take to work for lunch. After doing an inventory of the refrigerator, freezer, and pantry, I was still at a loss. Then I went through my saved recipes and discovered this egg salad recipe that I had saved back in December. I third-ed the original recipe, which made just enough for sandwiches for the rest of the week. I also added grated carrots. Next time I would lessen the amount of mayonnaise because the carrots added some extra moisture, and the salad was a little gloppier than I would've preferred today.


Curried Egg Salad
adapted from Cate's Kitchen

Ingredients

4 hard-boiled eggs, peeled and coarsely chopped
1/4 cup minced scallions
1/4 cup grated carrot
3-4 tbsp light mayonnaise
1/2 tsp curry powder
salt and pepper to taste

Combine all ingredients in a medium bowl. Add salt and pepper to taste.

Tuesday, April 28, 2009

South of the Border Stuffed Peppers

I'm completely aware that I just made stuffed peppers, but I had the rest of a bag of bell peppers to use up (which was cheaper than just buying the ones I specifically needed) when this popped up on my friend Melissa's blog. Besides the bell peppers, this was pretty pantry-friendly for me, and, like my dad, I don't think Joe ever gets tired of Mexican flavors.

These do take a little bit of time, but you could probably prepare the filling and stuff the peppers ahead of time. Or you can make extra and freeze it. I also love the little self-contained portions which definitely kept me from going back for more because they were so good.

South of the Border Stuffed Peppers
source: Mrs Sac's Purple Kitchen

Ingredients
1/2 lb ground turkey
3-4 large bell peppers, seeded/cored (If you don't have that many peppers, you can always eat the leftover filling in a tortilla with a little cheese.)
2 cloves garlic, minced
1/3 cup onion, finely chopped
1 cup cooked brown rice
1 cup fresh salsa
1/2 tsp cumin
1/2 tsp Mexican chili powder
1/2 tsp Adobo powder
salt and pepper to taste
1/4 tsp paprika
1/2-1/3 cup tomato sauce
1/2 can (3/4-1 cup) black beans, rinsed & drained
water
2% shredded Mexican blend cheese

Preparation
Preheat the oven to 350. Prepare rice according to directions, drain and set aside.

Meanwhile heat a large skillet over medium heat, add the turkey. While turkey is still browning, add in the onions and garlic and continue to cook till meat is browned and onions and garlic is softened and drain.

Return turkey mixture to skillet. Add in ingredients from cumin through paprika and 2 tbsp of water, stirring to coat. Add in the salsa, tomato sauce, beans and rice and heat through.

In a baking dish pour in a little tomato sauce and water to lightly coat the bottom and provide moisture. Fill in the peppers and place in dish. Add a couple of tablespoons of cheese on top and cover with tin foil.

After 30 minutes, remove foil and spoon juices over the peppers. Bake another 15-20 minutes, add a little more cheese on top if desired and bake another 5 minutes or so until melted.

Maple and Walnut Quick Bread

My Cooking Light magazines have a terrible habit of arriving in the mail right during my most hectic times at school when I should be studying instead of perusing magazines. This month was no exception, though it was an exceptional issue. I found myself flagging tons of recipes. All the food looked so seasonal and fresh and light. Plus a lot of it used ingredients I have on hand or know where to get.

I was up early Sunday morning before church with little to no appetite for anything in the house when I remembered this quick bread recipe in the Cooking Light issue so I whipped it up for later. I'm a sucker for quick breads but they often have quite a bit of oil and sugar in them. Without any walnut oil, I substituted applesauce, though I would definitely recommend the walnut oil.

The flavor in this loaf is very subtle, and I would say that the maple flavor develops better the next day. The crunchiness of the walnuts on top add a great textural balance to the chewy loaf. This was featured in a spread about healthy fats and noted that walnuts are a great source of poly-unsaturated fats. Plus they taste delicious!

Maple and Walnut Quick Bread
source: May 2009 issue

Ingredients
1 1/4 cup all-purpose flour
3/4 cup whole-wheat flour
1/2 cup sugar
2 tsp baking powder
1/2 tsp baking soda
1/2 tsp salt
1 cup low-fat buttermik
1/3 cup maple syrup
1/4 cup walnut oil
1 large egg
1/2 tsp vanilla extract
Cooking spray
1/3 cup finely chopped walnuts, toasted

Preparation
  1. Preheat oven to 350-degrees and grease an 8x4 inch loaf pan.
  2. Combine flours, sugar, baking powder, baking soda, and salt in a large bowl.
  3. Combine buttermilk, syrup, oil, and egg in a separate bowl.
  4. Making a well in the center of the dry mixture, pour the wet mixture into the center of the dry mixture, stirring just until moist. Stir in vanilla.
  5. Spoon batter into the loaf pan and sprinkle with walnuts.
  6. Bake at 350-degrees for 50 minutes or until a toothpick inserted in the center comes out clean. Cool in pan for 10 minutes on a wire rack; remove from pan. Cool completely on wire rack.
Yield: 1 loaf, serving size: 1 slice
Calories 178; Fat 6.5 g (sat 0.8g, mono 1.4g, poly 3.9g); Protein 3.6 g; Carb 27.5 g; Fiber 1.3 g; Chol 16 mg; Iron 1.1 mg; Sodium 224 mg; Calc 73 mg

Monday, April 27, 2009

Black Bean and Rice Stuffed Poblanos

Somehow the weather went straight from winter to summer, with spring being a few weeks of tornado-generating thunderstorms. After my exam on Thursday, I decided what would really make me happy would be to eat dinner out on our deck for the first time this season. And this meal fit the bill perfectly for the occasion.

It's a great light meal with a lot of flavor that is still filling. Joe helped me out in the kitchen by holding open the peppers for stuffing and putting together the salad. However, he neglected to remove the seeds and membrane from the jalapeno, so that was one HOT salad! I made a few changes and omissions based on what I did and didn't have in my kitchen, and Joe, who pretends he doesn't know anything about cooking, suggested I added a little cilantro to the salad next time and use lime juice instead of lemon. Little did he know that those things were actually in the original recipe!

This really came together pretty quickly for such a nice meal. I had dinner on the table within an hour without anything being prepped beforehand. We had quite a bit of stuffing leftover, but Joe quickly claimed the two leftover pepper halves and the stuffing to have with some tortillas and salsa while on-call at the hospital. He rarely likes leftovers, so this must've been a hit!

Black Bean and Rice Stuffed Poblanos with Creamy Corn and Avocado Salad
source: Ashlee's A Year in the Kitchen

Ingredients
Poblanos:
4 poblanos, 3 sliced lengthwise and gutted, 1 diced
3/4 red onion, diced
2 cloves garlic, minced
1 12 oz. can diced tomatoes (I used a 10 oz can of Ro-Tel)
1 c. chicken stock (I used veggie stock)
1 c. quick cooking rice
2 tsp. cumin
1 tsp. chili powder
Dash of hot sauce
Salt and pepper
1 can black beans, drained (I used 2 cups of soaked and cooked dry beans.)
1 c. shredded cheddar cheese

Corn Salad:
1 c. frozen corn kernels, defrosted but cold
1 avocado, diced
1/4 red onion, minced
1 tbsp. minced cilantro (I omitted)
1/4 jalapeno, minced
Juice of 1 lime (I used lemon juice.)
Salt and pepper

Preheat oven to 400.
Place 3 of the peppers in a baking dish, put in the oven while you prepare rice.
In a pot over medium heat, add 1 tbsp. EVOO, red onion, garlic, 1 diced poblano, salt and pepper. Saute vegetables for a few minutes, until slightly softened.
Add tomatoes, stock, spices, and bring to a boil.
Add rice, stir, bring back to a boil, cover, turn to low and simmer 15 minutes, or until rice is cooked.
Stir in black beans.
Take poblanos out of the oven, spoon beans and rice mixture into pepper cups, top with cheddar cheese, place back in the oven and cook for another 15 minutes, or until cheese is melted and peppers are soft.

To make corn salad:
Add corn, red onion, cilantro, jalapeno, lime juice, salt and pepper to a bowl. Mix well.
Add avocado, gently fold in avocado, do not break it up too much.
Keep chilled until serving.

Tuesday, April 21, 2009

Hot Cross Buns

I didn't get around to making hot cross buns for Western Easter but since one of my fellow classmates is Orthodox, I figured they were appropriate for the day after Orthodox Easter as a treat for my Greek class.

My first memory of hot cross buns is having them after the Easter Vigil service at the large Episcopal Church I grew up in. Episcopalians really know how to eat (and drink!), and the reception after Easter Vigil always had the best food: lots of Brie and other cheeses and crackers, etc. And, of course, hot cross buns.

I had a little bit of trouble with the recipe. The dough ended up really sticky, and I had to keep kneading flour into it, though I don't think I kneaded in enough. I also seem to have problems making food look pretty. My hot cross buns are terribly misshapen. Next time I make them, I will add vanilla extract or orange zest to the dough. The dough is sweet but not too sweet. In fact, it reminds me of things I've had from Asian bakeries with a very subtle hint of sweetness. I used raisins but you can use currants or candied fruit.

Hot Cross Buns
source: All Recipes

Ingredients:

Dough:
  • 3/4 cup warm water
  • 3 tbsp butter
  • 1 tablespoon instant powdered milk
  • 1/4 cup white sugar
  • 3/8 teaspoon salt
  • 1 egg
  • 1 egg white
  • 3 cups all-purpose flour
  • 1 tablespoon active dry yeast
  • 3/4 cup raisins
  • 1 teaspoon ground cinnamon
Topping:
  • 1 egg yolk
  • 2 tablespoons water
  • 1/2 cup confectioners' sugar
  • 1/4 teaspoon vanilla extract
  • 2 teaspoons milk
Preparation:
  1. Put warm water, butter, skim milk powder, 1/4 cup sugar, salt, egg, egg white, flour, and yeast in bread maker and start on dough program.
  2. When 5 minutes of kneading are left, add currants and cinnamon. Leave in machine till double.
  3. Punch down on floured surface, cover, and let rest 10 minutes.
  4. Shape into 12 balls and place in a greased 9 x 12 inch pan. Cover and let rise in a warm place till double, about 35-40 minutes.
  5. Mix egg yolk and 2 tablespoons water. Brush on balls.
  6. Bake at 375 degrees F (190 degrees C) for 20 minutes. Remove from pan immediately and cool on wire rack.
  7. To make crosses: mix together confectioners' sugar, vanilla, and milk. Brush an X on each cooled bun.

Sweet Corn Coffeecake with Berries


Those of us in my Koine Greek class have spent all semester together, working hard and struggling with the Gospel writers, Paul, the Septuagint, and Justin Martyr's account of Jesus' baptism. We've gotten to know each other well. In order to celebrate our last day of 8 am Greek class, I wanted to make some treats.

I made hot cross buns, but since some people might not like raisins, I wanted another option as well. This coffeecake was the perfect choice! The cornmeal lends a heartiness to it, and the yogurt and lemon zest give a nice tang. I used frozen berries, which promptly sank to the bottom, but no one seemed to mind.

This would be a perfect addition to a brunch or baby/wedding shower. It's unique and different from most coffeecakes and actually feels healthy when you're eating it!

Sweet Corn Coffeecake with Berries
source: Baking and Books

Ingredients
  • 1 1/3 cups all-purpose flour
  • 3/4 cup cornmeal, any color
  • 1/2 cup plus 2 tablespoons granulated sugar
  • 1 teaspoon baking soda
  • 2 teaspoons baking powder
  • 1/2 teaspoon salt
  • 1 cup lowfat, plain yogurt
  • Grated zest of 1 lemon (about 1 teaspoon, packed)
  • 2 teaspoons pure vanilla extract
  • 2 large eggs
  • 1/3 cup olive oil
  • 1 cup strawberries, stems removed and sliced in half vertically
  • 1/2 cup blackberries (I used 1 1/2 cups frozen mixed berries.)
  • Confectioners sugar, optional

Preheat your oven to 375 degrees F. Spray an 8-inch springform cake pan or 8-inch square pan with PAM, or another non-stick baking spray. Dust pan with flour, then tap off excess.

Whisk the dry ingredients together in a bowl. In a second bowl, combine the wet ingredients. Quickly add the wet ingredients to the dry, stirring to combine. Scrape into the pan. Scatter the berries over the top and bake in the center of the oven until the cake is browned and beginning to pull away from the sides of the pan, about 45 minutes. (Mine got a little too brown for my taste. I should've checked it earlier.)

Allow cake to cool for 5-10 minutes, then remove the rim of the springform pan, if applicable. Serve cake warm, dusted with confectioners sugar if you like.

Thursday, April 16, 2009

Rotini with Ricotta, Sausage, and Broccoli

I'm trying to be better about using up things in the pantry and refrigerator before I buy more. I think at one point, I had three quarter- or half-full boxes of pasta in my pantry. And as finals approach, I'm finding that it seems much more pressing to organize my kitchen than to review Zwinglian theology, so I'll see if I can nip that in the bud.

I loved using the ricotta as a sauce for the pasta. The lemon zest added more flavor. You can substitute a lot in this recipe. Use spinach instead of broccoli. The recipe I based this off of used prosciutto, but I used chicken sausage. Go with what you have!

Rotini with Ricotta, Sausage, and Broccoli
adapted from A Year in the Kitchen

1/2 a box of whole wheat rotini (or penne or rotelle or whatever)
1 cup lowfat ricotta cheese
zest of 1 lemon
2 links pre-cooked chicken sausage, sliced (I used Trader Joe's smoked apple and chardonnay)
1/4 cup vegetable or chicken stock
2 small heads of broccoli, chopped
1 tsp oil
Parmesan cheese
Salt and pepper

Put water on to boil for noodles. When water is at a rolling boil, pour in noodles.

Heat 1 tsp oil in a small skillet and add slices of sausage, turning until browned and heated through.

Mix together stock, zest, and ricotta, stirring to combine.

Add broccoli to the boiling water for the last few minutes of noodle-cooking time. Drain noodles and broccoli when cooked (about 8-10 minutes total).

Toss with sausage and ricotta mixture, sprinkling with Parmesan cheese and adding salt and pepper as desired.

Wednesday, April 15, 2009

Pizza Night

Last week was pretty insane, it being Holy Week and all, so I deemed Saturday Pizza Night before going to Easter Vigil. It was my last night of Lenten pescatarianism, so I knew pizza would be something easy to do, plus I had a bunch of odds and ends in the refrigerator that I wanted to use up. I also tried out a new pizza dough recipe, which left me with enough dough for two good-sized pizzas, so we each made our own pizza.

I was also feeling a little punchy after spending all week in church, so I ended up tossing my pizza dough for the first time. Joe thought it was going to end up all over the kitchen, but once I got a few good tosses in, he reached for the camera. Next time I'll work on improving my technique, but it was pretty fun!

Joe's pizza consisted of marinara sauce, TJ's smoked apple and chardonnay chicken sausage, fresh tomato slices, mozzarella cheese, and healthy dose of crushed red pepper.
My pizza had marinara sauce, spinach, mozzarella cheese, and fresh tomato slices. This made two meals each for the two of us. Not bad for using up a bunch of fridge remnants!
Pizza night was a big success. Not only did we enjoy making pizzas using our own toppings, but we put on music and danced around and it was a great way for Joe and I to spend a little quality time together in the middle of a stressful week.
I like this pizza crust a lot. The seasonings and parmesan cheese put it over the top, and it's a nice thick, chewy crust. I used subbed in half whole wheat flour to make it even heartier and a little healthier.

Easy Bread Machine Pizza Crust
source: RecipeZaar
Ingredients
1 1/2 cups warm water
2 tablespoons olive oil
2 cups bread flour
2 cups whole wheat flour
1 1/2 teaspoons salt
1/3 cup parmesan cheese
1 tablespoon italian seasoning
2 1/2 teaspoons active dry yeast
Preparation
1. Add ingredients to the bread machine in the order given. Set to dough setting and let run.
2. When finished, roll dough out to desired shape, top with desired toppings, and bake at 450-degrees for 15-20 minutes.

Friday, April 10, 2009

Raspberry Frozen Yogurt


The weather is still toying with full-blown spring, but I'm trying to build up a repertoire for my ice cream maker before the 90-degree weather hits. My preference for desserts tend to lead towards the fruity anyway, but this yogurt was to die for. This had such a different taste from store-bought frozen yogurt--very bright and fresh. I already had some frozen raspberries in the freezer, so I knew I would be making this right away. Look at that gorgeous color! And that's without any artificial colors or preservatives or anything! And the taste is tangy and summery but creamy at the same time. This would be beautiful served to company with a little mint leaves right on top.

My grocery store did not carry the type of Greek yogurt that I needed, so I bought regular whole-milk yogurt and drained it through a cheesecloth-lined mesh sieve over a pot for a few hours, until it was the texture of sour cream.

Raspberry Frozen Yogurt
source: Rec(ession)ipes

Ingredients
  • 2 cups Greek yogurt
  • 2.5 cups fresh or frozen raspberries
  • 1 tsp kirsch (or vodka if you don't have kirsch)
  • 3/4 cup sugar
  • Juice of 1/2 lemon

Preparation

In a blender, puree all ingredients. If you want to remove the seeds, push the pureed ingredients through a strainer. Chill for 1 hour, then freeze in ice cream maker according to manufacturer’s directions.

Quinoa Soup with Avocado and Corn

Well, I think Joe would've liked this soup, but I gobbled it all up before he could even try it. This is chock full of protein from the quinoa, healthy fats from the avocado, and veggies from the salsa. This meal is also very pantry-friendly for me, at least. All I needed to buy specifically for this dinner was the avocado. I followed Erin's lead and added some black beans for some extra heft.

I love lighter meals that still satisfy my tastebuds and leave me feeling full, and this falls perfectly into that category. It was also came together very quickly and made great leftovers. This will definitely be on the meal rotation again, particularly as we move into summer.

More information about quinoa (pronounced "keen-wa") can be found here and here. You can probably find it in your local grocery store in the organic/natural foods section or near the rice and couscous. Even my regular grocery store carries it, though appropriately, on the opposite side of the store from the buckets of chitterlings.

Quinoa Soup with Avocado and Corn
as seen on Erin's Food Files and Cheap Healthy Good

Ingredients
4 cups chicken or vegetable broth (I used veggie to keep it vegetarian.)
1 cup quinoa
1 cup corn (or hominy)
2/3 cup chunky salsa, to taste
1 ripe but firm Hass avocado, diced
Salt
1/4 cup chopped fresh cilantro
Lime wedges, for serving (optional) (I used a squeeze of lemon just to brighten up the flavors a bit.)

Preparation
In a large saucepan over high heat, bring the broth to a boil. Stir in the quinoa, reduce heat to medium-high, and continue boiling, uncovered, for 15 minutes.

Stir in the corn and salsa, then return to a simmer. Remove the pan from the heat and stir in the avocado. Season with salt and stir in the cilantro. Ladle into large bowls, accompanied with lime wedges.

Tuesday, April 7, 2009

Baked Rotini with Ricotta and Collard Greens

Spinach is one of my favorite foods, and I've been thinking for some time now about branching off and trying other members of the dark leafy greens family. Where I live, collard greens are usually prepared with a ham hock, so when I saw this meal, I was excited that it was a different preparation than I've traditionally seen. Plus, I knew I'd be able to find collard greens in my grocery store. Sure enough, I found them easily and they were CHEAP.

Joe actually preferred the collard greens to spinach because they maintain their structure better and don't get as slimy and mushy. The taste is slightly earthier, and they add heartiness to the pasta. With three cheeses, the pasta was deliciously creamy. I'm craving some right now just thinking about it.

Baked Rotini with Ricotta and Collard Greens
source: Stinkerpants Designs via The Kitchn

Ingredients
  • 1 (16-ounce) package rigatoni or penne pasta
  • 3 tbsp butter
  • 1 medium onion, chopped (about 1 cup)
  • 3 garlic cloves, minced
  • 1 pound collard greens, washed, drained, and chopped
  • 1/4 cup all-purpose flour
  • 1 1/2 cups milk (I used 1%)
  • 1 cup shredded mozzarella (I used part-skim)
  • 1 cup ricotta cheese (I used low-fat)
  • 2 teaspoons sugar
  • 2 teaspoons salt
  • 1/2 teaspoon freshly ground black pepper
  • 1 teaspoon red pepper flakes
  • 1/2 cup grated Parmesan cheese
Preparation

1. Prepare pasta according to directions. Drain and set aside. Preheat oven to 350°. Lightly grease a 13- x 9-inch baking dish.

2. Heat butter in a Dutch oven over medium-high heat; sauté onion 5 minutes or until just brown. Add garlic, and cook about 1 minute. Reduce heat to medium-low, and add greens; cover and cook 15 to 20 minutes or until greens are tender, stirring occasionally.

3. Sprinkle greens with flour. Cook uncovered, stirring constantly, 1 minute. Gradually add milk, stirring well. Cook 5 minutes, stirring often, until thickened and smooth. Remove from heat; stir in cooked pasta, mozzarella, and next 5 ingredients. Place into prepared dish, and sprinkle evenly with Parmesan.

4. Bake at 350° for 15 to 20 minutes.

Saturday, April 4, 2009

Snobby Joes

To say that it rained on Thursday night would be a gross understatement. Instead of normal rain, we got torrential spring downpour, tornadoes, and flash foods. So when the power went out in the middle of eating dinner, we just shrugged and lit some candles so we could see our food, which didn't make these Snobby Joes any less sloppy to eat.

I actually can't recall ever eating Sloppy Joes outside of a school cafeteria, but these are way better and obviously healthier. The lentils are packed with protein, leaving us full but not stuffed. I had pre-cooked the lentils earlier in the day since Thursdays are one of my late days, and the most time-intensive part of putting the meal together was chopping the onion.


I highly recommend these for people on a budget who are trying to make more meatless meals but are wary of tofu. It would be great for kids (lessen the chili powder to taste), and the leftovers are just as good the next day. This is delicious, hearty comfort food that's vegetarian!

Snobby Joes
source: Branny Boils Over
Yields at least 3 sandwiches

Ingredients

1/2 cup lentils boiled in 3 cups water, with a bay leaf
8 oz tomato sauce
1 T maple syrup
2 t spicy mustard
1 t oregano
1.5 T chili powder (or more if you're like me and accidentally dumped in a bunch much to Joe's delight)
1/2 onion, diced
1 garlic clove, minced
1/2 t salt

Saute onion and garlic and add to drained boiled lentils. Add spices and tomato sauce and simmer 10 minutes. Then cover and let stand for 10 minutes. Simmer a little more to reduce to the liquid if too soupy. Serve on buns or as desired with your favorite sandwich sides.

Thursday, April 2, 2009

Black Bean Burgers

Before Lent started, I wanted to be prepared for going pescatarian so I went to Epicurious and searched for easy vegetarian dinners. The funny thing is that I've hardly made any of the ones I tagged because I've had so many options! I went back this week for some ideas and found these burgers, involving Mexican flavors, always a hit in our house.

When I was at boarding school, we had very limited appealing options in the cafeteria, but oddly enough, there are some things that I still find myself craving. One of those things being black bean burgers. So not only were these a quick weeknight dinner, but for me, they were also nostalgic.

This quick dinner was made even faster because I had made the patties before going to work. When I walked in the door at 7:30, Joe was cooking the patties, had the coleslaw made, and the steak fries in the oven. He hadn't even seen the recipe, but I think he's watched me cook enough that he knew exactly what to do!

I served these on Arnold's Sandwich Thins, which are 100 calories a bun and were recommended by my mom, with a little sharp cheddar cheese and salsa. With coleslaw and steak fries on the side, I don't think Joe even minded that they were vegetarian. And, for my taste, they were a lot more flavorful than a regular meat burger.

I had a little trouble getting these to stay together and might add an egg to the mixture. I also pureed more of the beans because the whole beans were not incorporating well into the patties.

Black-Bean Burgers
source: Epicurious

Ingredients

3 cups cooked black beans, rinsed and drained, divided
3 tablespoons light mayonnaise
1/3 cup plain dry bread crumbs
2 teaspoons ground cumin
1 teaspoon dried oregano, crumbled
1/4 teaspoon cayenne
1/4 cup finely chopped cilantro
3 tablespoons vegetable oil
4 soft hamburger buns
Accompaniments: sour cream; salsa; lettuce

Pulse 2 cups beans in a food processor with mayonnaise, bread crumbs, cumin, oregano, and cayenne until a coarse purée forms. Transfer to a bowl and stir in cilantro and remaining cup of beans. Form mixture into 4 patties.

Heat oil in a 12-inch heavy skillet over medium-high heat until it shimmers. Cook burgers until outsides are crisp and lightly browned, turning once, about 5 minutes total. Serve on buns.

Heath Bar Crunch Ice Cream

Take a look at my newest kitchen toy, bought in brand-new condition off of Craigslist for significantly lower than retail price from a woman who had received it for a wedding present and never used it. Score!
I'm so excited and would highly recommend looking at CraigsList for kitchen appliances that other people might be trying to get rid of.

In order to convince Joe that it would be a worthy investment, I promised to make him something that he would love: Heath Bar Crunch ice cream. I had seen recipes on several blogs, and both Joe and I have a major weakness for anything involving toffee. Embarassingly enough, when we weren't as health-conscious, we would finish off a pint of Ben & Jerry's between the two of us on an all-too-frequent basis.Anyway, I knew this would be a hit, and it certainly was. Nothing beats homemade ice cream and knowing exactly what is going into your mouth. As the weather warms up, I'm sure I'll be using the ice cream maker more frequently!

Heath Bar Crunch Ice Cream
source: Annie's Eats

Ingredients

4 original Heath bars (1 1/8 oz. each)
2 large eggs
3/4 cup sugar
2 cups heavy whipping cream
1 cup milk
2 tsp. vanilla extract

Using a sharp knife, coarsely chop the Heath bars into large chunks. You should have about 1 cup (next time I’ll use 1 1/2 cups). Place the chunks in a bowl, cover, and freeze for about 1 hour.

Whisk the eggs in a mixing bowl until light and fluffy, 1-2 minutes. Whisk in the sugar, a little at a time, then continue whisking until completely blended, about 1 minute more. Pour in the cream, milk, vanilla extract, and whisk to blend.

Transfer the mixture to an ice cream maker and freeze according to the manufacturer’s instructions. After the ice cream has stiffened, transfer half of it to an air-tight storage container. Top with half of the Heath Bar pieces. Transfer the remaining ice cream to the container and top with the remaining Heath Bar pieces. Mix well until the candy pieces are evenly mixed throughout the ice cream. Store in the freezer until the ice cream is ready.

Note: This does contain raw eggs, so there is some risk involved if you are pregnant or otherwise immuno-compromised.

Wednesday, April 1, 2009

Spicy Thai Coconut Tofu Noodle Soup

I had scheduled myself to make this meal on Friday night, but I should know by now that I inevitably end up doing something else on Fridays because I get too tired to cook. So then, I figured I could make it for dinner Saturday, but we ended up going out to dinner with my parents. Sunday, still being considered a feast day during Lent, is the one day a week where I am technically "allowed" to eat meat, so I wanted to save this for a vegetarian day. Finally, I made it for dinner Monday night!

I added extra noodles, which ended up making it a little too noodle-y, though I still enjoyed it. I love the variety of vegetables and the textural contrast between the tofu and the snap peas. I added a little extra curry paste and still wished it had been slightly spicier.

Spicy Thai Coconut Tofu Noodle Soup
adapted from Ashlee's Cooking Blog

Ingredients
1 tbsp. olive oil
4 cloves garlic, minced
1/2 yellow onion, minced
4 tsp. ginger paste
Crushed red pepper
4 cups vegetable stock
1 15 oz. can light coconut milk
3 carrots, peeled and thinly sliced
1 1/2 cups sliced snap peas
1 6 oz package thin rice noodles
1 tbsp. cornstarch
2 1/2 tsp. hot red curry paste
2 tsp. honey
1 block extra firm tofu, diced

In a large pot, heat olive oil, sautee onion, garlic, ginger and crushed red pepper (to taste, about ¼ tsp.) till fragrant, about one minute.
Add chicken broth, coconut milk and carrots.
Bring to a gentle boil and cook for about 10 minutes or until carrots are tender.
Add the noodles and snap peas.
In a small bowl, mix cornstarch and warm water.
Add slurry, curry paste, honey and tofu.
Cook for about 5-10 more minutes. Garnish with lime wedges or scallions and serve.